

Bridal Modeling Guide Outline with Premier 30A Photographer
- Melonie Marie

- Aug 1
- 9 min read
Updated: 11 hours ago
I. Introduction to Bridal Modeling Playbook with a 30A Photographer
Purpose of this guide: To prepare models for a successful and professional bridal photoshoot by providing practical tips, from pre-shoot preparation to mastering key poses. This guide will help you understand the unique demands of bridal modeling and enable you to work confidently with photographers and stylists.
Understanding the role: Bridal modeling is about more than simply posing in a dress; it's about embodying a narrative. Your role is to convey the elegance, grace, and emotion of a bride on her wedding day. The most compelling images are those that tell a story, capturing moments of joy, serene contemplation, and anticipation. This requires a level of emotional engagement and subtle acting to bring the gown and the moment to life.
II. Pre-Shoot Preparation
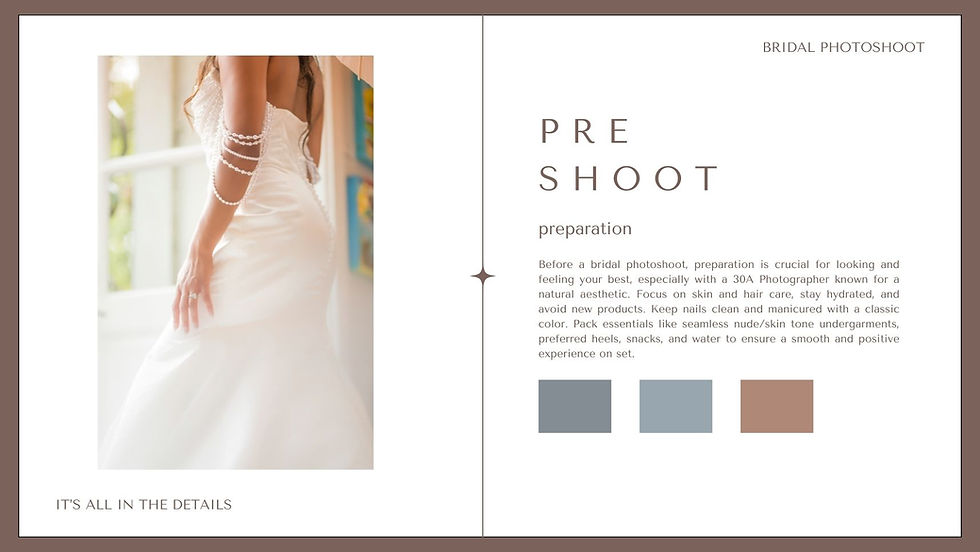
Skin & Hair Care:
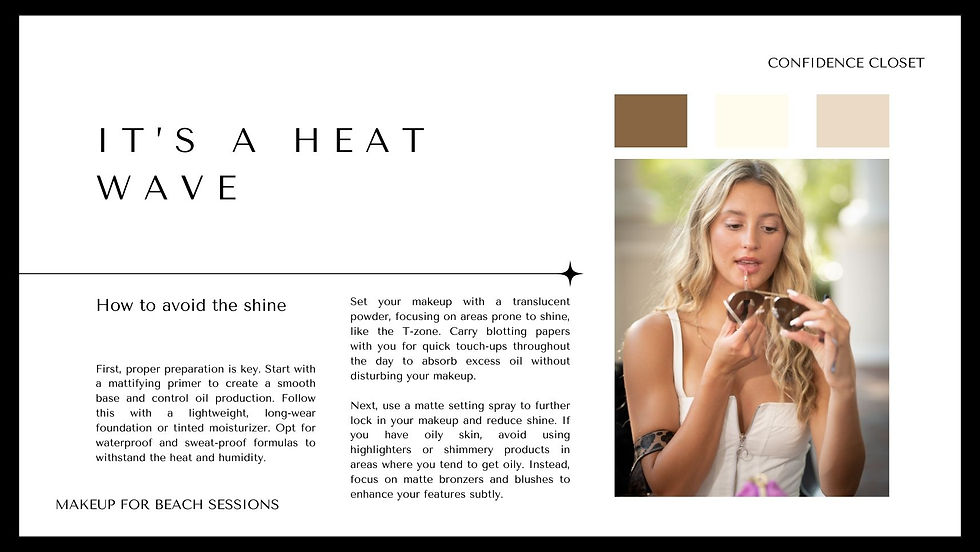
Hydrate and moisturize your skin in the days leading up to the shoot to achieve a natural, radiant glow, perfect for the 30A Photographer style.
Avoid new products that could cause irritation or a reaction.
Communicate with the hair and makeup artist about the planned look.
Maintain good posture; your 30A Photographer will appreciate a straight back and shoulders.
Nails:
Ensure nails (both fingers and toes) are clean and manicured. A simple, classic color like a French manicure or a soft pink is often best, as it won't clash with the soft, elegant aesthetic of the bridal gown and coastal setting.
Trust the creative vision of your 30A Photographer and be open to trying new and different poses.
What to Bring:
Skin-colored, seamless undergarments.
Nude Heels (or a wedding vibe shoe: white cowboy boots, converse, etc)
Snacks and water to stay energized.
A calm and positive attitude!

III. On-Set Etiquette & Professionalism
Communication:
Effective communication is crucial for a smooth and successful photoshoot. Your primary role is to listen to the photographer's and stylist's instructions. They have a specific vision for the shoot, and by paying close attention, you can quickly understand the desired poses, expressions, and angles. Don't be afraid to ask for a demonstration if a pose feels unclear. A clear understanding from the start will save time and help the team get the shots they need.
Beyond listening, proactive communication is key. If you're unsure about a direction or a specific pose, it's better to ask a question than to guess. You can say something like, "Could you show me what you mean by that?" or "Should my head be tilted more to the left?" This shows your engagement and ensures you are a collaborative partner in the creative process. It also helps avoid any confusion or frustration later in the shoot.
Your comfort and well-being are also important, so being vocal about them is essential. If a pose is causing discomfort, if the lighting is in your eyes, or if the dress needs an adjustment, let the team know respectfully. For example, "I can hold this pose for a little longer, but I'll need a quick break soon," or "The dress feels a bit tight here, could we adjust it?" This open dialogue builds trust and a positive working relationship, which will be reflected in your photos.
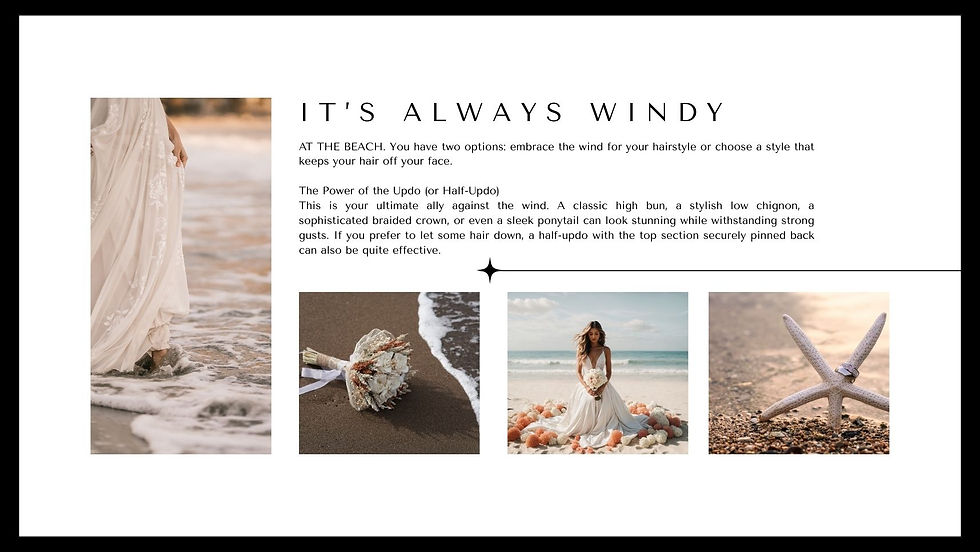
Engage with the veil, looking through it or letting it trail, as directed by your 30A Photographer.
Collaboration:
Remember that a photoshoot is a team effort. The photographer, stylist, and dress designer are all working together to create beautiful content. Each person brings their expertise to the table, and your role is to seamlessly integrate with their creative flow. By being open to their suggestions and offering your own ideas when appropriate, you contribute to a dynamic and productive environment where the best images are born from shared creativity.
This collaborative spirit is vital for ensuring a cohesive brand message. Every element, from your expression to the way you hold the bouquet, contributes to the overall story the images tell. When you understand the brand and the intended audience, you can align your performance to meet that vision. For example, a high-fashion designer might want a more serious, editorial look, while a bohemian brand would prefer a more relaxed and joyful vibe. By working in sync with the entire team, you help ensure that the final images not only look beautiful but also effectively communicate the brand's unique identity.
IV. Core Posing Techniques for Bridal Wear
Movement & Flow:
Walking and Turning: Creating a sense of movement is essential for showcasing the dress's fabric. Instead of a stiff, straight walk, take long, deliberate strides. Your movement should be fluid and graceful, as if you are gliding. When turning, use a slow, continuous motion, allowing the dress to flare out naturally. This will make the fabric look light and airy in the photographs. To practice at home, put on a long skirt or bathrobe and practice walking in front of a mirror, focusing on your posture and the rhythm of your steps.
Showcasing the Train: The train is often the most dramatic part of a wedding gown, and learning to work with it is a key skill. You can create different effects by simply turning or moving your body. A soft, gentle turn can make the train fan out beautifully behind you, while a quick spin can create a more dynamic, billowing effect. You can also kick the train gently to one side before you walk to create a feeling of effortless movement. Practice these movements at home by using a large sheet or blanket as a stand-in for the train, focusing on how your body's motion affects the fabric.
Hands & Arms:
Soft and Graceful Hand Positions: The placement of your hands and arms can significantly impact the elegance of a pose. Avoid letting your arms hang stiffly at your sides; instead, create soft curves and angles. When touching the dress, use a gentle, delicate touch rather than a firm grip. If holding a bouquet, keep your grip relaxed and natural. For close-up shots, your hands should be as elegant as the dress itself.
Hand Posing and Angles: One of the most common mistakes in modeling is showing the wide, flat side of your hand or palm directly to the camera, which can make your hands look large and awkward. Instead, always turn your hands to the side so they are angled away from the camera. This creates a more slender and graceful appearance. A good tip is to pretend you are holding a cup of tea, a delicate gesture that naturally angles your hands. To practice, sit in front of a mirror and practice different hand placements: one hand on your hip, one touching the neckline of the dress, or both hands gently linked in front of you. Focus on keeping your fingers slightly separated and relaxed, never clenched or spread wide.
Facial Expressions:
Embodying a Range of Emotions: The most captivating bridal photos tell a story through emotion. A serene expression conveys a quiet sense of peace and anticipation, achieved by relaxing your jaw and eyes. A joyful look goes beyond a simple smile; it should reach your eyes, creating crinkles at the corners. Think of a genuine moment of happiness, like seeing a loved one. A pensive expression can be created by looking slightly down or off-camera with a soft, contemplative gaze. And an elegant expression is about subtle confidence, a slight smirk, or a powerful look directly into the lens.
Practicing Different Looks: Practice these different expressions in front of a mirror. Pay attention to how small muscle movements in your eyes and mouth change your entire look. Try transitioning slowly from a joyful smile to a serene expression. You can also practice "smizing" (smiling with your eyes) while keeping your mouth relaxed. This will help you find your most photogenic angles and allow you to quickly shift between emotions on set, which is a key skill for a professional model.
Props & Accessories:
Holding the Bouquet: A bouquet is more than just a prop; it's a part of the bridal narrative. The most natural way to hold it is with a relaxed grip, keeping it at a comfortable height, typically around your waist. Avoid holding it too tightly or high up, as this can look stiff. You can also experiment with different placements—holding it to the side, cradling it in one arm, or letting it hang slightly.
Working with Veils: Veils add an element of romance and drama to a shot. Be mindful of its placement throughout the shoot. For a dreamy, ethereal look, you can gently toss the veil to create a floating effect. For close-up shots, it can be draped over your shoulders to frame your face. Communicate with the photographer and stylist about the desired effect, as they may have specific ideas for how the veil should be positioned.
Showcasing Jewelry: If you are wearing jewelry, pay attention to its placement. Subtly touch the necklace, run your fingers through your hair to show off earrings, or gently rest a hand to showcase a bracelet. Your movements should feel organic and effortless, not forced. The goal is to highlight the accessories without making the shot look like an advertisement.
V. Specific Poses & Shots | 30A Photographer Tips for Models for Bridal Dresses
Full-Length Shots:
Tip: To enhance the dress's silhouette, angle your body to the side rather than facing the camera directly. Place one foot slightly in front of the other and shift your weight to your back leg. This creates a more dynamic pose and a natural hourglass shape, making the dress hang beautifully. Avoid "slumping" and maintain good posture by keeping your shoulders back and your neck long.
Close-Up Detail Shots:
Tip: These shots are all about subtlety. To highlight intricate details like lace, beading, or the neckline, use your hands as a frame. Gently touch the fabric near the detail you want to showcase, or subtly rest your hand on your collarbone. Tilt your head slightly to direct attention to the neckline or earrings. Your expression should be soft and focused, drawing the viewer's eye to the delicate work of the dress.
Movement Shots:
Tip: For walking shots, focus on a fluid, confident stride. To make the dress fabric billow, you can start with a slight turn and then step forward, creating momentum. For a twirling shot, spin with a relaxed, joyful expression. The key is to keep your movements graceful and continuous, allowing the dress to become a part of the motion. Don't worry about perfect placement; the natural flow of the fabric is what will make the shot feel alive.
Over-the-Shoulder Shots:
Tip: This pose is perfect for showcasing the back of the dress, especially if it has an interesting cut-out or button details. Turn your body almost completely away from the camera and then look back over your shoulder. Avoid a sharp, unnatural turn of the neck; instead, rotate your entire upper body. Keep your expression soft and slightly mysterious, as if you're looking back at a loved one. This pose is particularly effective when you can slightly lift or hold the dress to give a glimpse of the train.
Sitting Poses:
Tip: Sitting in a wedding dress can be tricky. To avoid crushing the fabric, sit down very carefully, spreading the dress out around you. Use the fabric as a prop, letting it cascade around you to create a beautiful, soft visual. For elegance, keep your back straight and your shoulders relaxed. You can either look directly at the camera with a joyful expression or look off into the distance for a more pensive, romantic feel. Position your hands delicately in your lap or on your knees.
MODELS: CLICK HERE TO COMPLETE THE RELEASE FORM AND IMAGES FROM EVENT.

This guide provides a comprehensive overview of what to expect and how to excel during a bridal photoshoot. By preparing beforehand, communicating effectively on set, and practicing these key posing techniques, you will not only make the photographer's job easier but also ensure that your images truly capture the magic and elegance of the gowns.
Remember to take care of yourself throughout the day. Stay hydrated, listen to your body, and don't hesitate to ask for a short break if you need one. Most importantly, have fun with the process. A genuine smile and a relaxed demeanor will always shine through in the final photographs, helping to capture the authentic emotion of the wedding day. Your professionalism and collaborative spirit are what will make you a sought-after model in the bridal industry.
More Bridal Dress Modeling Tips
Here are 15 more tips for modeling a bridal dress!
Practice sitting elegantly in the dress; your 30A Photographer will capture stunning seated portraits.
Twist your torso slightly to the side to create a more dynamic pose for your 30A Photographer.
Place your hand gently on your waist or hip to accentuate your figure, as your 30A Photographer might suggest.
If the dress has a slit, practice a graceful way to reveal it for your 30A Photographer.
Allow a loved one to help you with the train or veil, creating a heartfelt moment for your 30A Photographer to capture.
Gaze down at the bouquet as if admiring it, creating a soft, pensive shot for the 30A Photographer.
Keep your shoulders relaxed and down, avoiding tension that a 30A Photographer would notice.
Bring your knees together when sitting to maintain a refined posture, a detail your 30A Photographer will appreciate.
If there are stairs, use them to create a dramatic, flowing effect with the skirt for your 30A Photographer.
Remember to adjust your stance to show off any unique back details of the dress, as directed by your 30A Photographer.
Hold your arms slightly away from your body to prevent them from looking flattened in photos from your 30A Photographer.
For a playful look, practice a light twirl, capturing the movement of the skirt for your 30A Photographer.
Practice a serious, thoughtful expression, as your 30A Photographer will want a variety of moods.
Ensure your footwear is comfortable enough for various poses, which will allow your 30A Photographer to be more flexible.
If the shoot is on a windy day, lean into it and let your veil and hair flow, as your 30A Photographer will use the environment to their advantage.
Comments